Core ML Background Removal in SwiftUI
Use the DeepLabV3 image segmentation model to add, remove, and modify image backgrounds in your iOS app


Core ML is Apple’s mobile machine learning framework that lets you deploy, run, and re-train models on a device.
From text and sound to image recognition, the number of things you can achieve with Core ML is limitless. On top of it all, there’s Vision, Apple’s own computer vision framework that provides more than half a dozen built-in models. More importantly, it acts as a container for Core ML to make pre-processing and inference a whole lot easier.
In this tutorial, we’ll be implementing one of the most popular use cases of machine learning on mobile: image segmentation in our iOS application.
Image segmentation is a deep learning mechanism that lets us segregate different objects in an image. It’s a commonly used computer vision technique in self-driving cars and for drawing bounding boxes in certain parts of an image.

In the next few sections, we’ll be using a DeepLabV3 model for segmenting the foreground and background parts of an image in our SwiftUI application. By doing so, you’ll be able to add, remove, and modify the backgrounds from your photos. After all, who wouldn’t want to flip their boring background sceneries with beautiful virtual backgrounds?
Without wasting any more time, let’s get started.
Obtaining the DeepLab Core ML Model
Previously, you’d have to convert it from other formats such as Pytorch and Tensorflow, but now Apple provides us with a downloadable Core ML file that can be used in Xcode directly. You can obtain the DeepLabV3 CoreML model from Apple’s Machine Learning page.
Launch a new Xcode project with SwiftUI as our user interface and drag-and-drop the Core ML file above. You should see the Core ML model description as shown below:

The input type is an Image with 513 x 513 dimensions, while the output is a MLMultiArray of the same size. We’ll soon see how to convert the output type into our desired image format.
But first, let’s set up our SwiftUI view.
Setting Up Our SwiftUI View
The following code displays two images on the screen that are spaced equally. The one on the left is the input image and the one on the right will eventually show the segmentation results.
| struct ContentView: View { | |
| @State var outputImage : UIImage = UIImage(named: "unsplash")! | |
| @State var inputImage : UIImage = UIImage(named: "unsplash")! | |
| var body: some View { | |
| ScrollView{ | |
| VStack{ | |
| HStack{ | |
| Image(uiImage: inputImage) | |
| .resizable() | |
| .aspectRatio(contentMode: .fit) | |
| Spacer() | |
| Image(uiImage: outputImage) | |
| .resizable() | |
| .aspectRatio(contentMode: .fit) | |
| } | |
| Spacer() | |
| Button(action: {runVisionRequest()}, label: { | |
| Text("Run Image Segmentation") | |
| }) | |
| .padding() | |
| } | |
| } | |
| } | |
| //.... more here | |
| } |
Note: The runVisionRequest function invoked in the SwiftUI Button action is where we’ll implement the Core ML image segmentation.
Here’s a screengrab of the current SwiftUI view:

Running Image Segmentation Using Vision Request
Next, let’s set up our vision request to run the DeepLabV3 image segmentation model:
| func runVisionRequest() { | |
| guard let model = try? VNCoreMLModel(for: DeepLabV3(configuration: .init()).model) | |
| else { return } | |
| let request = VNCoreMLRequest(model: model, completionHandler: visionRequestDidComplete) | |
| request.imageCropAndScaleOption = .scaleFill | |
| DispatchQueue.global().async { | |
| let handler = VNImageRequestHandler(cgImage: inputImage.cgImage!, options: [:]) | |
| do { | |
| try handler.perform([request]) | |
| }catch { | |
| print(error) | |
| } | |
| } | |
| } |
There are a few things that we can draw on from the code above:
Core ML deprecated the default init method (
DeepLabV3()) in iOS 14, so we’ve used the newinit(configuration:).VNCoreMLModelis a container for Core ML models. We need this format to perform Vision processing using theVNCoreMLRequest.Once the
VNCoreMLRequestis completed, it triggers the completion handler function. In our case, we’ve defined it in avisionRequestDidCompletefunction.The
VNImageRequestHandlerfunction is where our Vision request is triggered. We pass the input image (which Vision pre-processes to match the model input size) here and set theVNCoreMLRequestin thehandler.performfunction.
Retrieving the Segmentation Mask From the Output
Once the VNImageRequest is completed, we can handle the results in the visionRequestDidComplete completion handler that’s defined below:
| func visionRequestDidComplete(request: VNRequest, error: Error?) { | |
| DispatchQueue.main.async { | |
| if let observations = request.results as? [VNCoreMLFeatureValueObservation], | |
| let segmentationmap = observations.first?.featureValue.multiArrayValue { | |
| let segmentationMask = segmentationmap.image(min: 0, max: 1) | |
| self.outputImage = segmentationMask!.resizedImage(for: self.inputImage.size)! | |
| maskInputImage() | |
| } | |
| } | |
| } |
There are a few inferences to draw from the code above:
The output returned from the Vision image analysis is a dictionary:
VNCoreMLFeatureValueObservation.The
MLMultiArraythat contains our segmentation map resides in the first key of the dictionary.We need to convert the 2D array segmentation map into a
UIImage. In order to do this, I’ve used Matthijs Hollemans’s CoreMLHelper tools that reduce the boilerplate code we write. You can find that code at the end of this tutorial.The
segmentationmap.image(min: 0, max: 1)helper function converts theMLMultiArraytoUIImage, which we can then resize to match our initial image’s size.The
resizedImageis aUIImageSwift extension that I wrote. It’s available in this gist.The
maskInputImage()function is where we’ll mask our initial image with the segmentation results to produce new backgrounds.
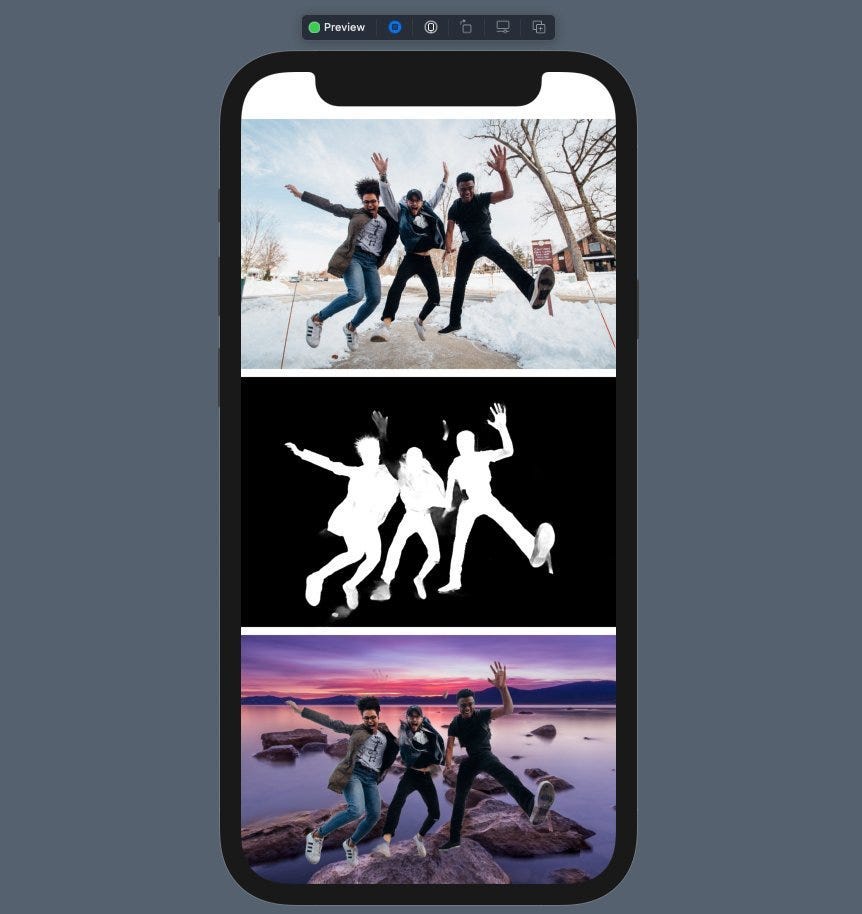
Now that our segmentation mask is ready, let’s take a look at it:

Great! Our segmentation mask separates the foreground image from the background by using different colors for each set of pixels.
Now, it’s time to brush up on our CoreImage skills to blend the mask on the image.
Modify Backgrounds by Using the Segmentation Mask
Core Image is Apple’s image processing library. It provides a vast variety of image filters to choose from.
In our case, we need to blend the segmentation mask on the original image such that the background is hidden. Also, we’d like to add a new background.
Core Image’s CIBlendWithMask filter would be perfect for our case. Here’s a look at how it operates:

Let’s take a look at the maskInputImage function where our CIBlendWithMask filter runs:
| func maskInputImage(){ | |
| let bgImage = UIImage.imageFromColor(color: .blue, size: self.inputImage.size, scale: self.inputImage.scale)! | |
| let beginImage = CIImage(cgImage: inputImage.cgImage!) | |
| let background = CIImage(cgImage: bgImage.cgImage!) | |
| let mask = CIImage(cgImage: self.outputImage.cgImage!) | |
| if let compositeImage = CIFilter(name: "CIBlendWithMask", parameters: [ | |
| kCIInputImageKey: beginImage, | |
| kCIInputBackgroundImageKey:background, | |
| kCIInputMaskImageKey:mask])?.outputImage | |
| { | |
| let ciContext = CIContext(options: nil) | |
| let filteredImageRef = ciContext.createCGImage(compositeImage, from: compositeImage.extent) | |
| self.outputImage = UIImage(cgImage: filteredImageRef!) | |
| } | |
| } |
Here are a few key observations about this code:
imageFromColoris a Swift extension to convert solid colors into UIImage. We pass the color, input image size, andscale. Setting the same scale is very important to ensure theCGImagesize matches with our original image. Otherwise, the Core ImageCIBlendWithMaskfilter gives a distorted result.The
CIBlendWithMaskfilter requires three parameter keys:kCIInputImageKey,kCIInputBackgroundImageKey, andkCIInputMaskImageKey.The
outputImagereturned from the filter is a CIImage. To convert it into UIImage, we first convert it into a CGImage by usingcreateCGImage.
The final output of an image with a changed background is shown below:

Blending Gradient Backgrounds in the Image
Besides a solid color, you can add any image as the background for your subject. Let’s set gradient colors.
I’ve used this Stack Overflow answer to implement the UIImage extension for gradients. Here’s the result:

More Fun
We saw how to use Core ML and Vision to remove and modify backgrounds in images with a SwiftUI implementation. You can do a lot more — like blurring backgrounds or hiding only a part of the background image.
Just for fun, I replaced the background with the Eiffel Tower:
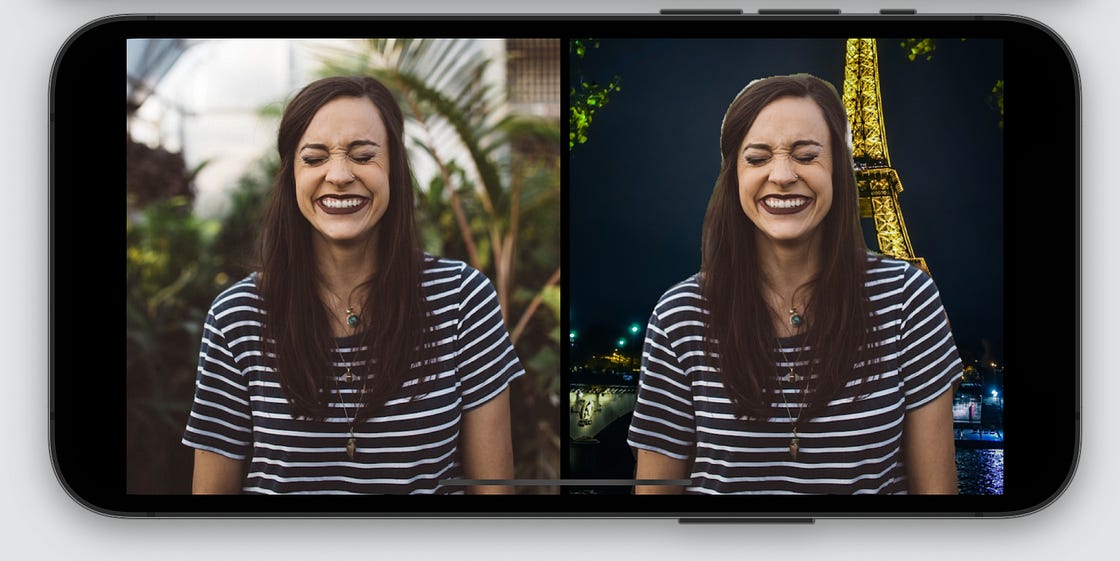
let bgImage = UIImage(named: "tower")!.resized(to: self.inputImage.size, scale: self.inputImage.scale)I cannot stress how important it is to use the same scale for the background image to ensure it fits the view.
The full source code of this project is available in this GitHub repository.
That’s it for this one. Try using an image with a group of people and see how it fares. Here’s one example: