

Introducing to PencilKit in iOS 13


WWDC 2019 introduced another interesting framework, PencilKit for iOS 13. Apple introduces this drawing and annotation framework to make it easier for developers to integrate it into their own apps.
The goal of this article is to walk through the PencilKit architecture and implement it in our iOS Application.
Note: PencilKit requires Xcode 11 and iOS 13.
PencilKit: Inside the Wood
PKCanvasViewis the region inside where the drawing is possible. The user can draw all their art and doodles here.PKCanvasViewallows panning and zooming since it's essentially a part of theUIScrollView.PKDrawingis the data model responsible for storing all the drawings.PKCanvasViewhas adrawingproperty that’s used to get and set the data model.PKToolPickeris the floating UI that consists of all the brushes, color palettes, and helper tools for the drawing.PKToolsholds the different kinds of brushes — which are essentially subclasses:
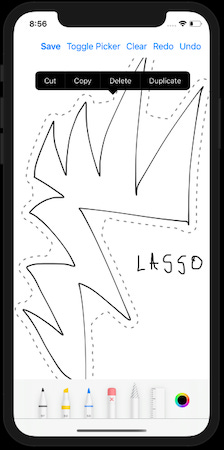
PKEraserTool: This requires specifying either vector or bitmap as the type. Accordingly, the vector objects or pixels can be erased from the screen.PKInkingTool: These includepen,marker, andpencilfor different kinds of sketchesPKLassoToolis a selection tool for selecting a drawing area. It pops up a context menu that allows copy/paste and duplicating the selected drawing.
Here’s a look at the lasso tool in action on an iOS device.
The ToolPicker is a floating panel on regular-size classes (iPad devices), but it’s fixed to the bottom of the screen in the compact-size classes.
Also, the undo/redo and minimize buttons are not available in the compact version of ToolPicker.
The ToolPicker palette has a responder-based visibility. That means that it’s visible when the PKCanvasView is the firstResponder and can be hidden by resigning PKCanvasView from the first responder.
To enable/disable finger drawing with PencilKit, we can toggle the Boolean property allowsFingerDrawing on the PKCanvasView.
Enough talk. Let’s build our iOS application using PencilKit now.
Implementation
We’ll be implementing the following things in our iOS application.
Adding undo/redo draw actions for iOS devices
Saving drawing sketches to the photos library
Set Privacy — Photo Library Additions Usage Description to Allowed in Info.plist in order to save images.
Our Storyboard
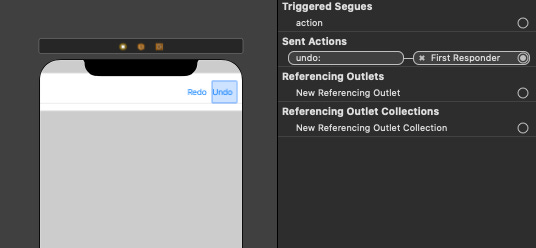
For the undo and redo actions, we’ve used the built-in selectors.
Setting the Canvas View
The following code sets the Canvas View for you:
| let canvasView = PKCanvasView(frame: .zero) canvasView.translatesAutoresizingMaskIntoConstraints = false | |
| view.addSubview(canvasView) | |
| NSLayoutConstraint.activate([ canvasView.topAnchor.constraint(equalTo: navigationBar.bottomAnchor), canvasView.bottomAnchor.constraint(equalTo: view.bottomAnchor), canvasView.leadingAnchor.constraint(equalTo: view.leadingAnchor), canvasView.trailingAnchor.constraint(equalTo: view.trailingAnchor), ]) |
Setting the ToolPicker
The initialization is done by asking for the shared ToolPicker for the window
Canvas View needs to be added as an observer to the ToolPicker
setVisibletrue indicates that whenever the Canvas View becomes the first responder, the palette will show upguard let window = view.window, let toolPicker = PKToolPicker.shared(for: window) else { return } toolPicker.setVisible(true, forFirstResponder: canvasView) toolPicker.addObserver(canvasView) canvasView.becomeFirstResponder()
Clear the Canvas View
In order to clear the PKCanvasView, just reinitialize the PKDrawing instance.
canvasView.drawing = PKDrawing()Saving drawing to UIImage
func image(from rect: CGRect, scale: CGFloat) is invoked on the PKDrawing instance.
It returns a UIImage of the portion of the drawing, we want to capture.
The scale is typically set to 1.0. Set higher values for a more detailed image (useful for retina display).
let image = canvasView.drawing.image(from: canvasView.drawing.bounds, scale: 1.0)UIImageWriteToSavedPhotosAlbum(image, self, nil, nil)Here’s the full source code of our PencilKit iOS 13 application:
| import UIKit | |
| import PencilKit | |
| class ViewController: UIViewController { | |
| let canvasView = PKCanvasView(frame: .zero) | |
| @IBOutlet weak var navigationBar: UINavigationBar! | |
| override func viewDidLoad() { | |
| super.viewDidLoad() | |
| setNavigationBar() | |
| canvasView.translatesAutoresizingMaskIntoConstraints = false | |
| view.addSubview(canvasView) | |
| NSLayoutConstraint.activate([ | |
| canvasView.topAnchor.constraint(equalTo: navigationBar.bottomAnchor), | |
| canvasView.bottomAnchor.constraint(equalTo: view.bottomAnchor), | |
| canvasView.leadingAnchor.constraint(equalTo: view.leadingAnchor), | |
| canvasView.trailingAnchor.constraint(equalTo: view.trailingAnchor), | |
| ]) | |
| } | |
| func setNavigationBar() { | |
| if let navItem = navigationBar.topItem{ | |
| let saveItem = UIBarButtonItem(title: "Save", style: .done, target: self, action: #selector(saveImage)) | |
| let clearItem = UIBarButtonItem(title: "Clear", style: .plain, target: self, action: #selector(clear)) | |
| let toggleItem = UIBarButtonItem(title: "Toggle Picker", style: .plain, target: self, action: #selector(togglePicker)) | |
| navItem.rightBarButtonItems?.append(clearItem) | |
| navItem.rightBarButtonItems?.append(toggleItem) | |
| navItem.rightBarButtonItems?.append(saveItem) | |
| } | |
| } | |
| @objc func saveImage() { | |
| let image = canvasView.drawing.image(from: canvasView.drawing.bounds, scale: 1.0) | |
| UIImageWriteToSavedPhotosAlbum(image, self, nil, nil) | |
| } | |
| @objc func clear() { | |
| canvasView.drawing = PKDrawing() | |
| } | |
| @objc func togglePicker() { | |
| if canvasView.isFirstResponder{ | |
| canvasView.resignFirstResponder() | |
| }else{ | |
| canvasView.becomeFirstResponder() | |
| } | |
| } | |
| override func viewDidAppear(_ animated: Bool) { | |
| super.viewDidAppear(animated) | |
| guard | |
| let window = view.window, | |
| let toolPicker = PKToolPicker.shared(for: window) else { return } | |
| toolPicker.setVisible(true, forFirstResponder: canvasView) | |
| toolPicker.addObserver(canvasView) | |
| canvasView.becomeFirstResponder() | |
| } | |
| } |
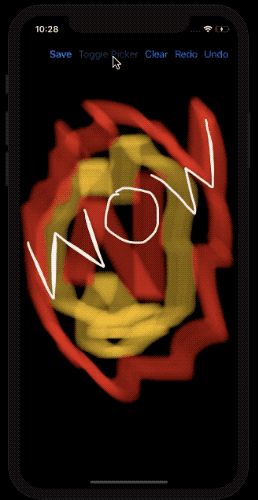
Here’s an output of the PencilKit application in action on an iPhone device:
Conclusion
That sums up this introductory article on PencilKit in iOS 13. Now go draw and doodle with it.
You can download the full source code from our Github repository.
Next Part
Yes, we have a sequel! We’ll be implementing Core ML alongside PencilKit by using the famous MNIST model in the next part.