
Cropping Areas Of Interest Using Vision in iOS
Extract salient features using the upgraded Vision framework

Apple introduced plenty of new features in the Vision Framework during WWDC 2019. Besides providing built-in image classification models for identifying pet animals and bringing improvements in face feature tracking, one of the features that stood out was saliency.
Saliency has many applications in computer vision and image processing. From highlighting areas of interest, to blur detection, anomaly detection, automated image cropping, and post-processing of images — the list could go on.
What is Saliency?
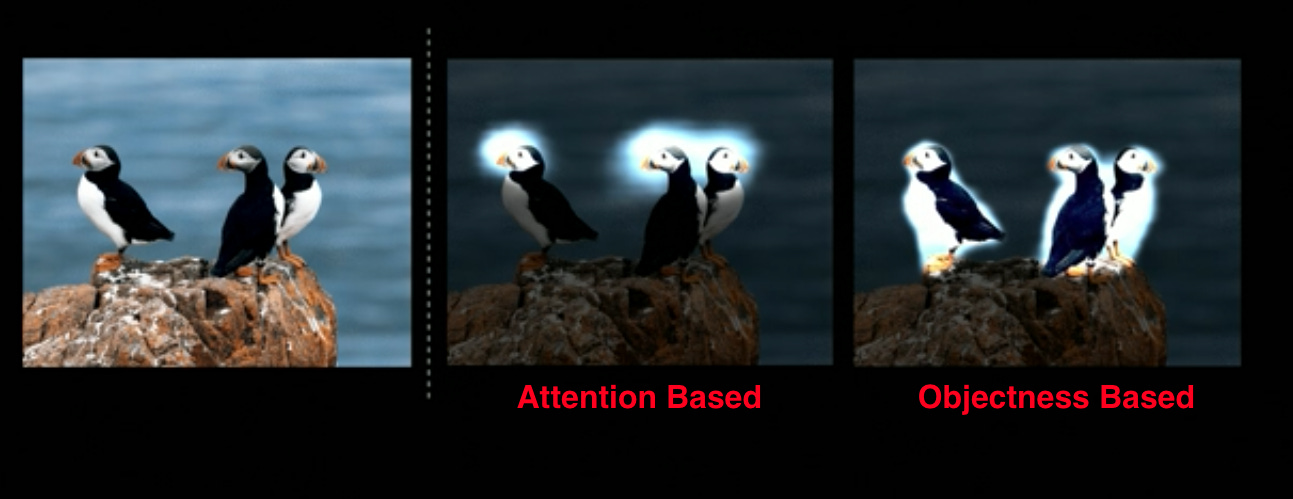
In simple terms, saliency implies the most noticeable or important features. Saliency is largely split into two types:
Attention-Based Saliency — This algorithm provides features of the image that catch the human eye at first glance. The model for this algorithm was trained based on where people looked in the image when they were shown a batch of images.
Objectness-Based Saliency — This was trained on object segmentation in order to highlight the prominent objects present in the image.
Attention-based saliency is the trickier one as it relies on a number of things, such as faces, contrast, and lighting in the image, to determine the parts that are eye-catching.
Each of these saliency types returns a heatmap which is essentially 68X68 pixel buffers that hold the value of saliency for each region of the image.
Our Goal
We’ll be developing an iOS application that automatically crops an image to display only the salient regions. We’ll be using both saliency types and will compare the results.
Implementation
To keep things simple, the UI consists of an Image and a Button, both created programmatically in our ViewController. The button selector is responsible for selecting the images using the ImagePickerController as shown below:
For this to work as intended, make sure you’ve implemented the UIImagePickerControllerDelegate, UINavigationControllerDelegate protocols and also added the privacy usage permissions for the photos library in your info.plist file.
| func imagePickerController(_ picker: UIImagePickerController, | |
| didFinishPickingMediaWithInfo info: [UIImagePickerController.InfoKey : Any]) { | |
| dismiss(animated: true) { | |
| if let image = info[UIImagePickerController.InfoKey.originalImage] as? UIImage { | |
| self.imageView?.image = image | |
| self.processImage(image) | |
| } | |
| } | |
| } |
Inside the processImage function our vision API handles the saliency request. We’ll take a look at that in the next section.
Setting Up Our Vision Request
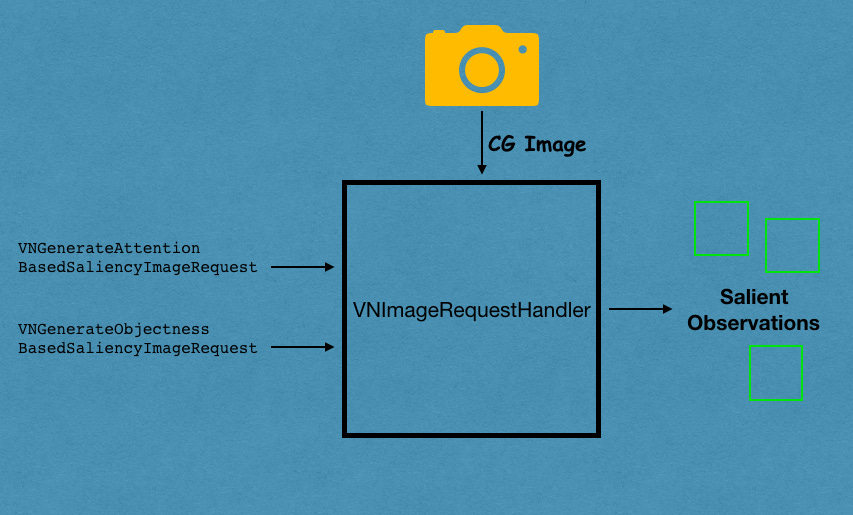
We’ll use the standard VNImageRequestHandler to handle our image and pass the algorithm type in the vision request handler, as shown below:
| let requestHandler = VNImageRequestHandler(cgImage: originalImage, options: [:]) | |
| let saliencyRequest = VNGenerateAttentionBasedSaliencyImageRequest(completionHandler: nil) | |
| try requestHandler.perform([self.saliencyRequest]) | |
| guard let results = self.saliencyRequest.results?.first else{return} | |
| let observations = results as? VNSaliencyImageObservation | |
| let salientObjects = observation.salientObjects |
There are some pretty new terms in the above code. Let’s look at what they are:
The
salientObjectsproperty is an array ofVNRectangleObservationfor all the prominent features detected by the algorithm. It holds theboundingBoxfor each of the features and the confidence thresholds. For cropping the image to display the prominent features only, we’ll merge all the salient bounding boxes regions.The bounding boxes returned by the vision framework uses a normalized coordinate system such that the lower-left point is the origin. Hence, we’ll pass the bounding boxes union to a
VNImageRectForNormalizedRectto project the salient region into the UIKit coordinate system.In cases, where the image has no highlights, the
salientObjectsreturned are empty.
The following code contains the full implementation of the vision request that crops the image based on salient features:
| private let workQueue = DispatchQueue(label: "VisionRequest", qos: .userInitiated, attributes: [], autoreleaseFrequency: .workItem) | |
| private func processImage(_ image: UIImage) { | |
| guard let originalImage = image.cgImage else { return } | |
| workQueue.async { | |
| let requestHandler = VNImageRequestHandler(cgImage: originalImage, options: [:]) | |
| do { | |
| try requestHandler.perform([self.saliencyRequest]) | |
| guard let results = self.saliencyRequest.results?.first | |
| else{return} | |
| if let observation = results as? VNSaliencyImageObservation | |
| { | |
| var unionOfSalientRegions = CGRect(x: 0, y: 0, width: 0, height: 0) | |
| let salientObjects = observation.salientObjects | |
| let showAlert = (salientObjects?.isEmpty ?? false) | |
| for salientObject in salientObjects ?? [] { | |
| unionOfSalientRegions = unionOfSalientRegions.union(salientObject.boundingBox) | |
| } | |
| if let ciimage = CIImage(image: image) | |
| { | |
| let salientRect = VNImageRectForNormalizedRect(unionOfSalientRegions, | |
| Int(ciimage.extent.size.width), | |
| Int(ciimage.extent.size.height)) | |
| let croppedImage = ciimage.cropped(to: salientRect) | |
| let thumbnail = UIImage(ciImage:croppedImage) | |
| DispatchQueue.main.async { | |
| if showAlert{ | |
| let alertController = UIAlertController(title: "Oops!", message: "No highlights were found", preferredStyle: .alert) | |
| alertController.addAction(UIAlertAction(title: "Dismiss", style: .default, handler: { _ in | |
| })) | |
| self.present(alertController, animated: false, completion: nil) | |
| } | |
| self.imageView?.image = thumbnail | |
| } | |
| } | |
| } | |
| } catch { | |
| print(error) | |
| } | |
| } | |
| } |
Attention-based saliency types return just one bounding box while the objectness-based algorithm can return up to three bounding boxes.
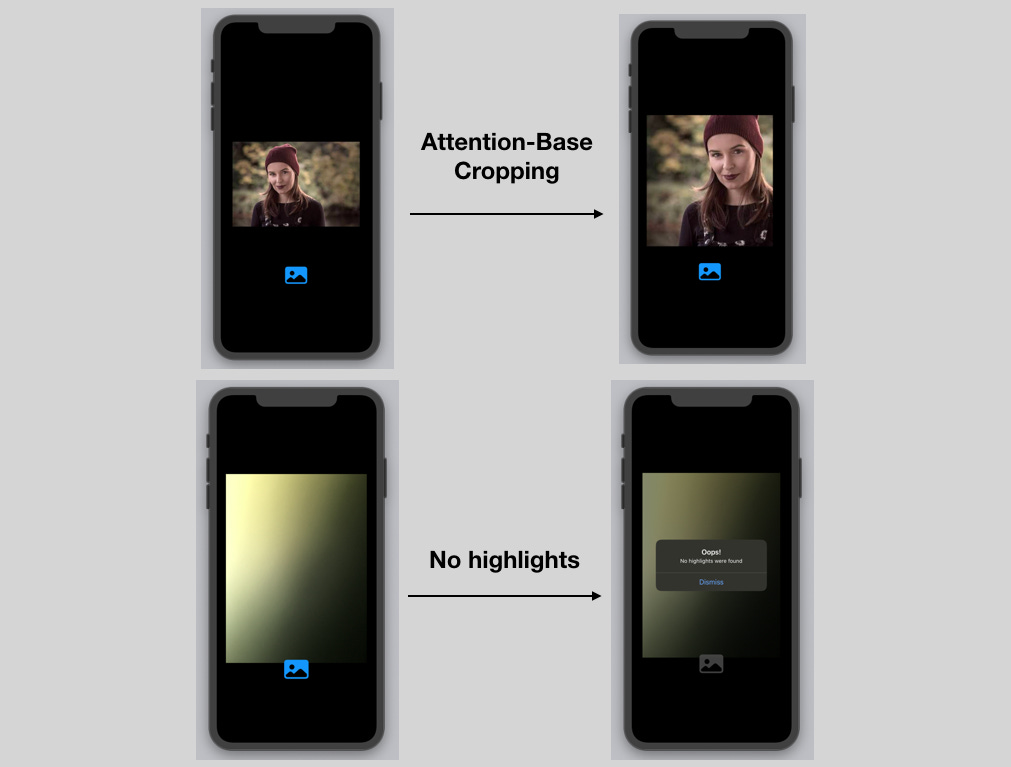
The output of the application in action is given below:
Now let’s compare the objectness and attention-based types on a landscape image as shown below:
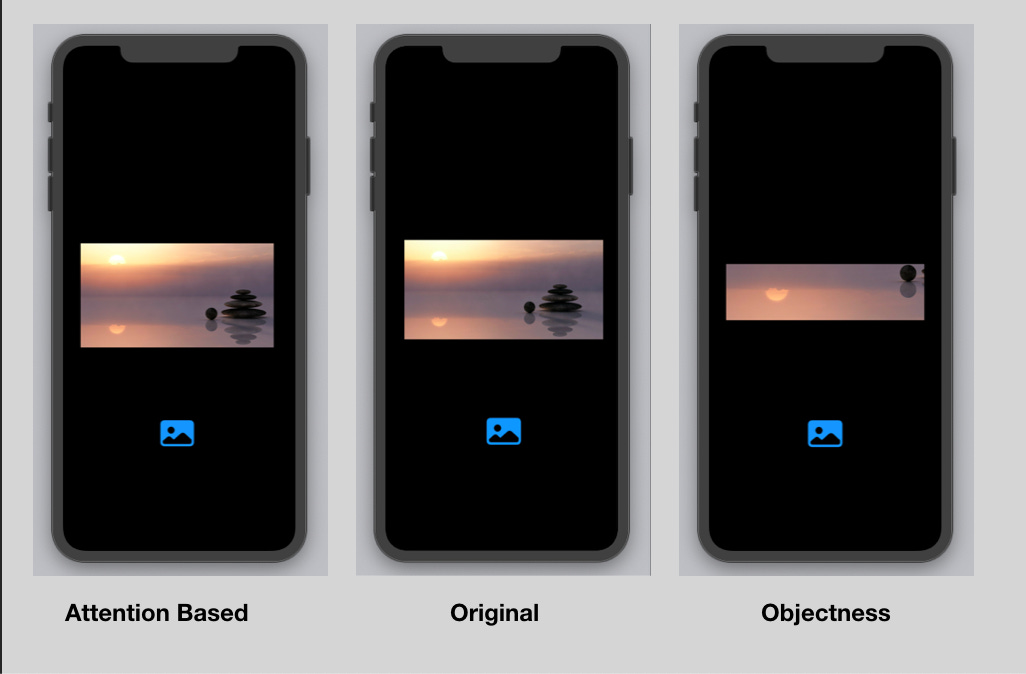
The attention-based algorithm doesn’t have much impact on landscape images. You can use either of the saliency request types depending on the use cases. For showing the portion of interest in thumbnails, attention-based saliency is generally used.
Conclusion
We’ve had a good look at the saliency feature of vision and compared the attention-based and objectness-based types. Vision framework has many more advancements coming this year, such as image similarity, faced capture quality, etc — more on them soon! The full source code of the above example is available in the Github Repository.
That’s it for this one. I hope you enjoyed reading.