

Classify Movie Reviews With Natural Language Framework, Core ML, and SwiftUI
Classify Movie Reviews With Natural Language Framework, Core ML, and SwiftUI
Exploring Apple’s new built-in sentiment analysis and NLP’s Text classification on a Rotten Tomatoes dataset


Apple showed some good progress in the field of Natural Language Processing during WWDC 2019. They’ve brought enhancements in both Text Classification And Word Tagging, the two pillars of NLP.
In this article, we’ll be discussing the advancements in Text Classification only, which deals with classifying input text to a set of predefined class labels.
This year, Apple brings in the transfer learning technique for text classifiers model training. Transfer learning pays heed to the semantics of the overall context of the text and is able to figure out cases where the same word has different meanings in different parts of the text.
Though state of the art transfer learning is better equipped for semantic analysis, it does take a bit longer time to train than a say, maximum entropy algorithm.
Apple also introduces built-in sentiment analysis this year. Using the NLP framework, now you get a score in the range -1 to 1 signifying the degree of sentiment.
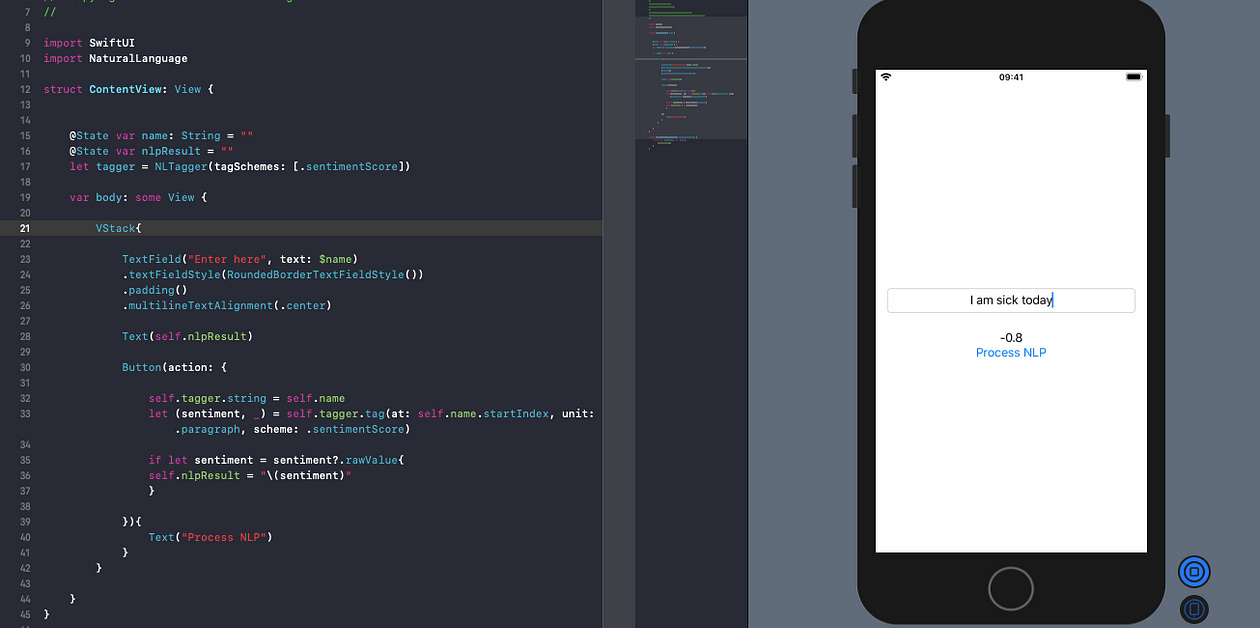
Here’s a sample code showing how NLP’s built-in sentiment analysis predicts the sentiment score in a string:
import NaturalLanguagetagger.string = textlet (sentiment, _) = tagger.tag(at: text.startIndex, unit: .paragraph, scheme: .sentimentScore)print(sentiment.rawValue)The built-in sentiment analysis is pretty accurate as we can see below:
In the next sections, we’ll be using Rotten Tomatoes dataset to create a Text Classifier Core ML Model using Create ML and deploy it in our Natural Language Framework.
Plan Of Action
Converting the CSV dataset to Train Test Folders.
Training the dataset using Create ML.
Deploying the Core ML model in the Natural Language Framework with SwiftUI.
Converting Our Dataset
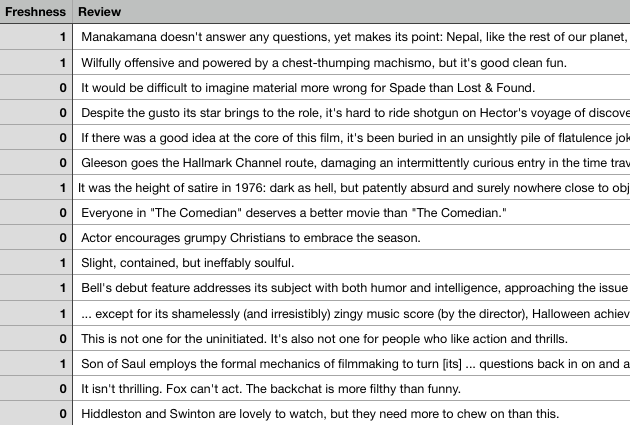
Our dataset is a CSV file as shown below:
The following python script is used to split the CSV into training and test data folders:
import os
import pandas as pddf = pd.read_csv("rotten_tomatoes_reviews.csv", nrows=50000)
df.columns = ["freshness", "review"]
# Split data into training and testing sets by label
train = df.sample(frac=0.8, random_state=42)
train_good = train[train.freshness == 1]
train_bad = train.drop(train_good.index)
test = df.drop(train.index)
test_good = test[test.freshness == 1]test_bad = test.drop(test_good.index)
# Create folders for data
os.mkdir("train"); os.mkdir("test")
os.mkdir("train/good"); os.mkdir("train/bad")
os.mkdir("test/good"); os.mkdir("test/bad")
#Write out data
def write_text(path, df):
    for i, r in df.iterrows():
        with open(path + str(i) + ".txt", "w") as f:
            f.write(r["review"])
write_text("train/good/", train_good)
write_text("train/bad/", train_bad)
write_text("test/good/", test_good)
write_text("test/bad/", test_bad)
For the sake of simplicity and time, we’ll parse the first 50000 rows out of the 4,80,000 Rotten Tomato review and split the dataset into the standard 80–20 ratio for the train and test folder.
Once the CSV is split into the respective folders, we can launch our Create ML application which has now got an independent entity this year.
Create ML Text Classifier Model
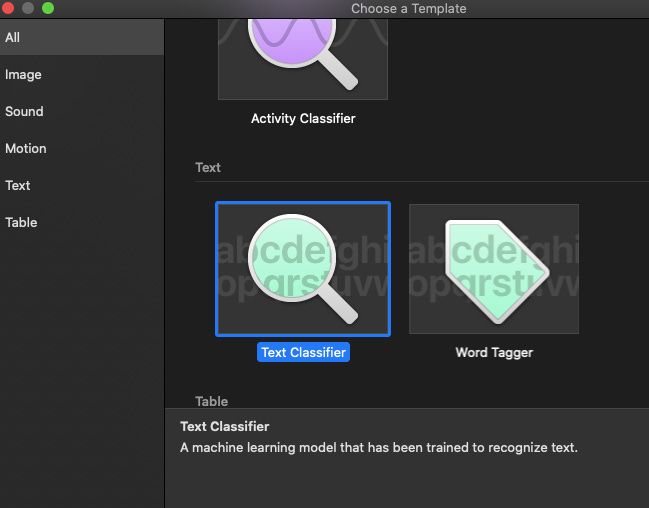
Create a new Text Classifier Model Project in Create ML and add the training folder. You can choose any of the techniques to train your model and go have a cup of coffee while the training and validation happens. It took me 4 hours to get a Transfer learning model trained.
Here’s an illustration that compares the model metrics across the two techniques in Text Classification:
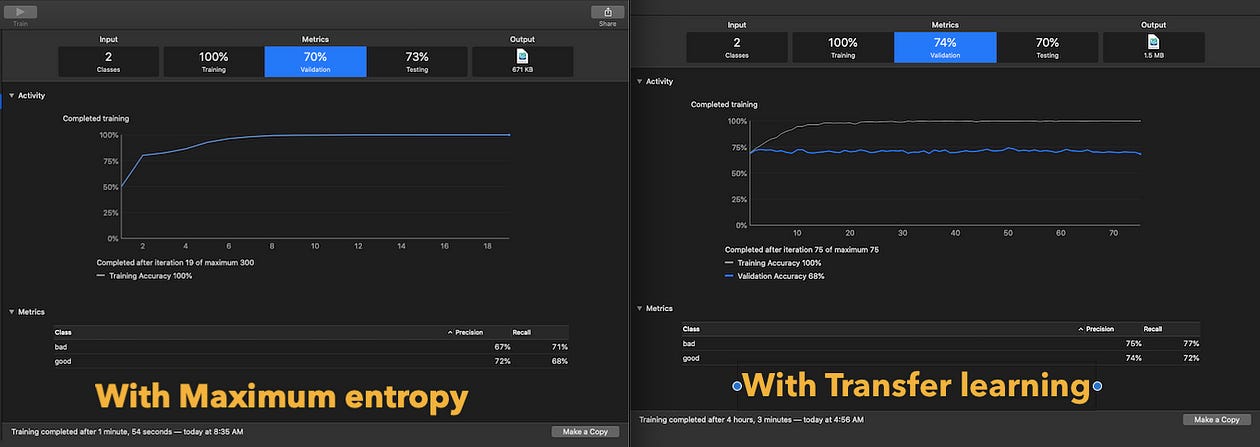
The transfer learning based model extrapolates better. Though you can try achieving better accuracy by increasing the dataset size(TL model training took four hours on a dataset of 15000 texts for me).
Alternatively, you can create your model programmatically using Create ML. Just pass the desired algorithm in the argument ModelParameters .
init(trainingData: MLTextClassifier.DataSource, parameters: MLTextClassifier.ModelParameters)Evaluating Our Model
Once the model is trained and tested, hop onto the Output tab in Create ML and enter texts to run predictions. The following illustration shows some of the predictions I ran.

Now our model is ready to be deployed for natural language processing.
Deploying A Core ML Model
Create a new Xcode SwiftUI based project and drag and drop the Core ML model we’d created earlier.
We’ll be developing an application that shows a list of texts(typically Rotten Tomato reviews) on which we’ll run our Core ML Model using NLP to determine whether it was a rot or not(good or bad review).
Also, we’ll be running NLP’s built-in sentiment analysis to know how it predicts the Rotten Tomato reviews and see how accurate the degree of sentiment and the CoreML predictions are.
The following code shows how to feed a Core ML model into the Natural Language Framework:
import NaturalLanguage

let predictor = try NLModel(mlModel: ReviewClassifier().model)

predictor.predictedLabel(for: "Fight Club was a master piece. One of it's kind cinema.")
Creating SwiftUI Lists With Navigation
Let’s start off by creating a SwiftUI List that’s populated using a Reviews structure that conforms to the Identifiable protocol.
In the above code, we’ve added navigation links to the List items that takes them to the ReviewDetail view which we shall see next:
| struct ReviewDetail: View { | |
| var review: String | |
| @State var mlPrediction = "" | |
| @State var nlpResult = "" | |
| let tagger = NLTagger(tagSchemes: [.sentimentScore]) | |
| var reviewPredictor : NLModel? | |
| var body: some View { | |
| return VStack{ | |
| Text(review) | |
| Button(action:{ | |
| self.tagger.string = self.review | |
| if let string = self.tagger.string{ | |
| let (sentiment,_) = self.tagger.tag(at: string.startIndex, unit: .paragraph, scheme: .sentimentScore) | |
| self.nlpResult = "\(sentiment?.rawValue ?? "")" | |
| } | |
| }){ | |
| Text("Run Sentiment Analysis") | |
| } | |
| Text(self.nlpResult) | |
| Button(action:{ | |
| self.runPrediction() | |
| }){ | |
| Text("Run Core ML Prediction") | |
| } | |
| Text(self.mlPrediction) | |
| } | |
| } | |
| func runPrediction(){ | |
| do{ | |
| let reviewPredictor = try NLModel(mlModel: ReviewTextClassifier().model) | |
| let label = reviewPredictor.predictedLabel(for: self.review) | |
| self.mlPrediction = label ?? "" | |
| }catch(let error){ | |
| print("error is \(error.localizedDescription)") | |
| } | |
| } | |
| } |
The above code is straightforward. We’ve added two SwiftUI buttons that evaluate the text for sentiment analysis and how good or bad the review is, respectively.
In return, we get the following outcome in our SwiftUI preview:
NLP’s built-in sentiment analysis did a pretty fine job with a dataset it’s largely not familiar with. At the same time, our Core ML model performed decently with the Natural Language Framework in determining whether the reviewer loved the film or panned it.
Conclusion
So that sums up Core ML and Natural Language Framework. We saw how the built-in sentiment analysis is such a powerful tool in language processing.
The full source code along with the python script for parsing the CSV is available in this Github Repository. Also, it contains models built using max entropy and transfer learning. You can try playing around with them and see which fits the bill better.
That’s it for this one. I hope you enjoyed reading and model training!