
Swipeless Tinder Using iOS 14 Vision Hand Pose Estimation
Let’s use the power of computer vision to detect hand gestures in iOS

The introduction of iOS 14 brought in a slew of enhancements and interesting new features in Apple’s computer vision framework.
Vision framework was released in 2017 in a bid to allow mobile application developers to leverage complex computer vision algorithms with ease. Specifically, the framework incorporates a host of pre-trained deep learning models whilst also acting as a wrapper to quickly run your own custom Core ML models.
After the introduction of Text Recognition and VisionKit in iOS 13 to boost OCR, Apple shifted its focus towards sports and action classification in iOS 14’s Vision framework.
Primarily, the Vision framework now lets you do Contour Detection, Optical Flow Request and includes a bunch of new utilities for offline video processing. But more importantly, we can now do Hand and Body Pose Estimation — which certainly opens the door for new possibilities in augmented reality and computer vision.
In this article, we’re focusing on Hand Pose estimation to build an iOS app that lets you perform touchless finger gestures.
If you’ve been following my pieces, I’ve already demonstrated how to Build a Touchless Swipe iOS App Using ML Kit’s Face Detection API. I felt that prototype was cool to integrate into dating apps like Tinder, Bumble, and more. But at the same time, it could cause eye strains and headaches due to the blinks and turns.
So, we’ll simply extend that use case by using hand pose gestures instead to swipe left or right — because in 2020, it's OK to be lazy and practice social distancing with our phones. Before we dive into the deep-end, let’s look at how to create a Vision Hand Pose Request in iOS 14.
Vision Hand Pose Estimation
The new VNDetectHumanHandPoseRequest is an image-based vision request that detects a human hand pose. It returns 21 landmark points on each hand in an instance of the type:VNHumanHandPoseObservation. We can set the maximumHandCount to be detected in each frame during the Vision processing.
To get the points array of each finger, we’ll simply invoke the enum on the instance in the following way:
try observation.recognizedPoints(.thumb)
try observation.recognizedPoints(.indexFinger)
try observation.recognizedPoints(.middleFinger)
try observation.recognizedPoints(.ringFinger)
try observation.recognizedPoints(.littleFinger)
There’s also a wrist landmark that’s located on the center of the wrist and is not part of any of the above groups. Instead, it falls in the all group and can be retrieved in the following way:
let wristPoints = try observation.recognizedPoints(.all)Once we’ve got the above points array, we can extract the individual points in the following way:
guard let thumbTipPoint = thumbPoints[.thumbTip],
let indexTipPoint = indexFingerPoints[.indexTip],
let middleTipPoint = middleFingerPoints[.middleTip],
let ringTipPoint = ringFingerPoints[.ringTip],
let littleTipPoint = littleFingerPoints[.littleTip],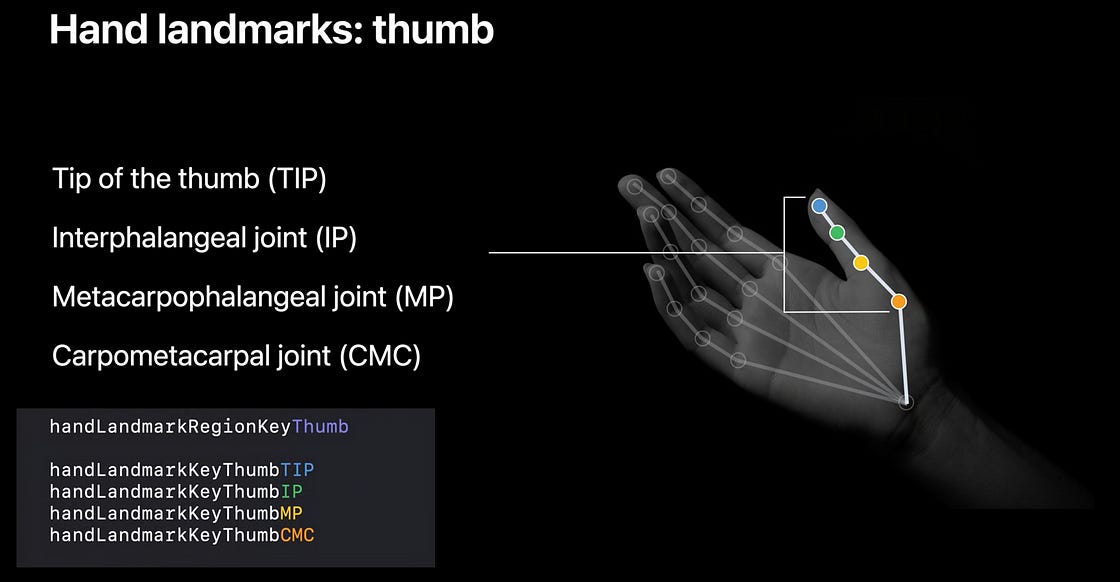
let wristPoint = wristPoints[.wrist]else {return}thumbIP, thumbMP, thumbCMC are the other individual points that you can retrieve from the thumb’s point group (and so on for the other fingers).
Each of the individual point objects contains the location in an AVFoundation coordinate-system along with their confidence threshold.
Subsequently, we can find distances or angles between points to create certain gesture processors. For instance, in Apple’s demo application, they’ve created a pinch gesture by calculating the distance between thumb and index tip points.
Getting Started
Now that we’re done with the basics of Vision Hand Pose Request, let's dive into the implementation.
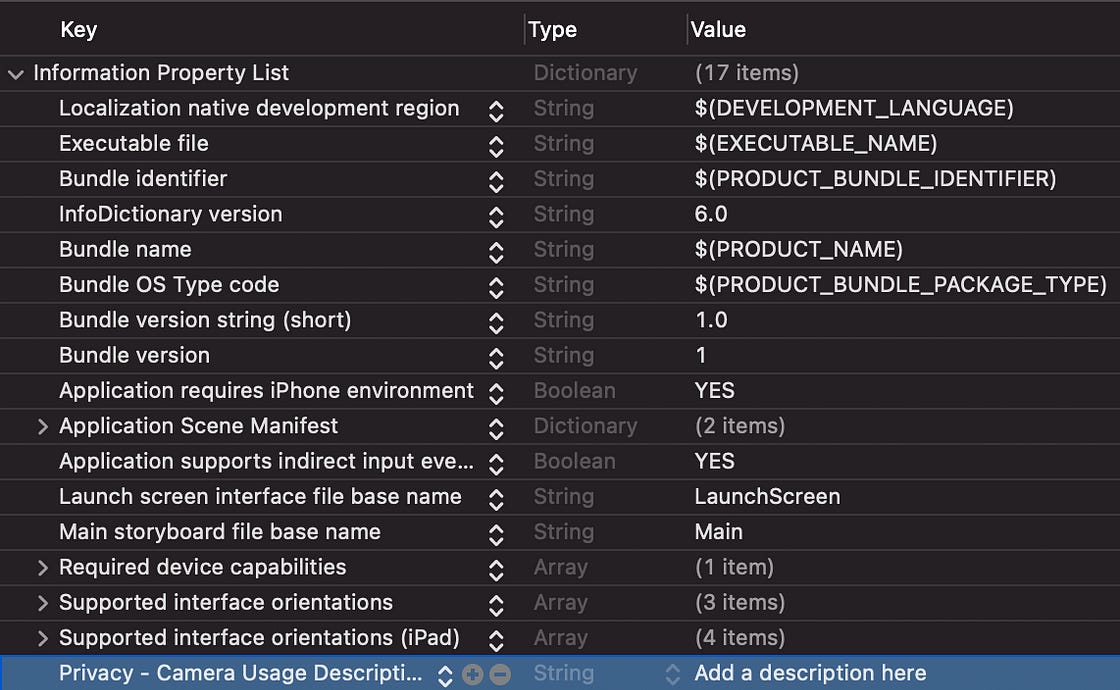
Launch your Xcode and create a new UIKit application. Make sure you’ve selected the deployment target as iOS 14 and have set the NSCameraUsageDescription string in the Info.plist.
Since we’ve already covered how to create Tinder-esque cards with animation, here’s the final code for that class.
Similarly, here’s the code for the StackContainerView.swift class that holds the bunch of Tinder cards.
Setting Up Our Camera Using AVFoundation
Next up, let’s create our own custom camera using Apple’s AVFoundation framework.
Here’s the code for the ViewController.swift file:
| class ViewController: UIViewController, HandSwiperDelegate{ | |
| //MARK: - Properties | |
| var modelData = [DataModel(bgColor: .systemYellow), | |
| DataModel(bgColor: .systemBlue), | |
| DataModel(bgColor: .systemRed), | |
| DataModel(bgColor: .systemTeal), | |
| DataModel(bgColor: .systemOrange), | |
| DataModel(bgColor: .brown)] | |
| var stackContainer : StackContainerView! | |
| var buttonStackView: UIStackView! | |
| var leftButton : UIButton!, rightButton : UIButton! | |
| var cameraView : CameraView! | |
| //MARK: - Init | |
| override func loadView() { | |
| view = UIView() | |
| stackContainer = StackContainerView() | |
| view.addSubview(stackContainer) | |
| configureStackContainer() | |
| stackContainer.translatesAutoresizingMaskIntoConstraints = false | |
| addButtons() | |
| configureNavigationBarButtonItem() | |
| addCameraView() | |
| } | |
| override func viewDidLoad() { | |
| super.viewDidLoad() | |
| title = "HandPoseSwipe" | |
| stackContainer.dataSource = self | |
| } | |
| private let videoDataOutputQueue = DispatchQueue(label: "CameraFeedDataOutput", qos: .userInteractive) | |
| private var cameraFeedSession: AVCaptureSession? | |
| private var handPoseRequest = VNDetectHumanHandPoseRequest() | |
| let message = UILabel() | |
| var handDelegate : HandSwiperDelegate? | |
| func addCameraView() | |
| { | |
| cameraView = CameraView() | |
| self.handDelegate = self | |
| view.addSubview(cameraView) | |
| cameraView.translatesAutoresizingMaskIntoConstraints = false | |
| cameraView.bottomAnchor.constraint(equalTo: view.bottomAnchor).isActive = true | |
| cameraView.centerXAnchor.constraint(equalTo: view.centerXAnchor).isActive = true | |
| cameraView.widthAnchor.constraint(equalToConstant: 150).isActive = true | |
| cameraView.heightAnchor.constraint(equalToConstant: 150).isActive = true | |
| } | |
| //MARK: - Configurations | |
| func configureStackContainer() { | |
| stackContainer.centerXAnchor.constraint(equalTo: view.centerXAnchor).isActive = true | |
| stackContainer.centerYAnchor.constraint(equalTo: view.centerYAnchor, constant: -60).isActive = true | |
| stackContainer.widthAnchor.constraint(equalToConstant: 300).isActive = true | |
| stackContainer.heightAnchor.constraint(equalToConstant: 400).isActive = true | |
| } | |
| func addButtons() | |
| { | |
| //full source of UI setup at the end of this article | |
| } | |
| @objc func onButtonPress(sender: UIButton){ | |
| UIView.animate(withDuration: 2.0, | |
| delay: 0, | |
| usingSpringWithDamping: CGFloat(0.20), | |
| initialSpringVelocity: CGFloat(6.0), | |
| options: UIView.AnimationOptions.allowUserInteraction, | |
| animations: { | |
| sender.transform = CGAffineTransform.identity | |
| }, | |
| completion: { Void in() }) | |
| if let firstView = stackContainer.subviews.last as? TinderCardView{ | |
| if sender.tag == 0{ | |
| firstView.leftSwipeClicked(stackContainerView: stackContainer) | |
| } | |
| else{ | |
| firstView.rightSwipeClicked(stackContainerView: stackContainer) | |
| } | |
| } | |
| } | |
| func configureNavigationBarButtonItem() { | |
| navigationItem.rightBarButtonItem = UIBarButtonItem(title: "Reset", style: .plain, target: self, action: #selector(resetTapped)) | |
| } | |
| @objc func resetTapped() { | |
| stackContainer.reloadData() | |
| } | |
| override func viewDidAppear(_ animated: Bool) { | |
| super.viewDidAppear(animated) | |
| do { | |
| if cameraFeedSession == nil { | |
| cameraView.previewLayer.videoGravity = .resizeAspectFill | |
| try setupAVSession() | |
| cameraView.previewLayer.session = cameraFeedSession | |
| } | |
| cameraFeedSession?.startRunning() | |
| } catch { | |
| AppError.display(error, inViewController: self) | |
| } | |
| } | |
| override func viewWillDisappear(_ animated: Bool) { | |
| cameraFeedSession?.stopRunning() | |
| super.viewWillDisappear(animated) | |
| } | |
| func setupAVSession() throws { | |
| // Select a front facing camera, make an input. | |
| guard let videoDevice = AVCaptureDevice.default(.builtInWideAngleCamera, for: .video, position: .front) else { | |
| throw AppError.captureSessionSetup(reason: "Could not find a front facing camera.") | |
| } | |
| guard let deviceInput = try? AVCaptureDeviceInput(device: videoDevice) else { | |
| throw AppError.captureSessionSetup(reason: "Could not create video device input.") | |
| } | |
| let session = AVCaptureSession() | |
| session.beginConfiguration() | |
| session.sessionPreset = AVCaptureSession.Preset.high | |
| // Add a video input. | |
| guard session.canAddInput(deviceInput) else { | |
| throw AppError.captureSessionSetup(reason: "Could not add video device input to the session") | |
| } | |
| session.addInput(deviceInput) | |
| let dataOutput = AVCaptureVideoDataOutput() | |
| if session.canAddOutput(dataOutput) { | |
| session.addOutput(dataOutput) | |
| // Add a video data output. | |
| dataOutput.alwaysDiscardsLateVideoFrames = true | |
| dataOutput.videoSettings = [kCVPixelBufferPixelFormatTypeKey as String: Int(kCVPixelFormatType_420YpCbCr8BiPlanarFullRange)] | |
| dataOutput.setSampleBufferDelegate(self, queue: videoDataOutputQueue) | |
| } else { | |
| throw AppError.captureSessionSetup(reason: "Could not add video data output to the session") | |
| } | |
| session.commitConfiguration() | |
| cameraFeedSession = session | |
| } | |
| } |
There’s a lot happening in the above code. Let’s break it down.
CameraViewis a custom UIView class that displays the camera contents on the screen. We’ll come to it shortly.setupAVSession()is where we’re setting up the front-facing camera and adding it as the input to theAVCaptureSession.Subsequently, we’ve invoked the
setSampleBufferDelegateon theAVCaptureVideoDataOutput.
The ViewController class conforms to HandSwiperDelegate protocol:
protocol HandSwiperDelegate {
  func thumbsDown()
  func thumbsUp()
}
We’ll trigger the respective method when the hand gesture is detected. Now, let’s look at how to run a Vision request on the captured frames.
Running Vision Hand Pose Request On Captured Frames
In the following code, we’ve created an extension of our above ViewController which conforms to AVCaptureVideoDataOutputSampleBufferDelegate:
| extension ViewController: AVCaptureVideoDataOutputSampleBufferDelegate { | |
| public func captureOutput(_ output: AVCaptureOutput, didOutput sampleBuffer: CMSampleBuffer, from connection: AVCaptureConnection) { | |
| var thumbTip: CGPoint? | |
| var wrist: CGPoint? | |
| let handler = VNImageRequestHandler(cmSampleBuffer: sampleBuffer, orientation: .up, options: [:]) | |
| do { | |
| // Perform VNDetectHumanHandPoseRequest | |
| try handler.perform([handPoseRequest]) | |
| guard let observation = handPoseRequest.results?.first else { | |
| cameraView.showPoints([]) | |
| return | |
| } | |
| // Get points for all fingers | |
| let thumbPoints = try observation.recognizedPoints(.thumb) | |
| let wristPoints = try observation.recognizedPoints(.all) | |
| let indexFingerPoints = try observation.recognizedPoints(.indexFinger) | |
| let middleFingerPoints = try observation.recognizedPoints(.middleFinger) | |
| let ringFingerPoints = try observation.recognizedPoints(.ringFinger) | |
| let littleFingerPoints = try observation.recognizedPoints(.littleFinger) | |
| // Extract individual points from Point groups. | |
| guard let thumbTipPoint = thumbPoints[.thumbTip], | |
| let indexTipPoint = indexFingerPoints[.indexTip], | |
| let middleTipPoint = middleFingerPoints[.middleTip], | |
| let ringTipPoint = ringFingerPoints[.ringTip], | |
| let littleTipPoint = littleFingerPoints[.littleTip], | |
| let wristPoint = wristPoints[.wrist] | |
| else { | |
| cameraView.showPoints([]) | |
| return | |
| } | |
| let confidenceThreshold: Float = 0.3 | |
| guard thumbTipPoint.confidence > confidenceThreshold && | |
| indexTipPoint.confidence > confidenceThreshold && | |
| middleTipPoint.confidence > confidenceThreshold && | |
| ringTipPoint.confidence > confidenceThreshold && | |
| littleTipPoint.confidence > confidenceThreshold && | |
| wristPoint.confidence > confidenceThreshold | |
| else { | |
| cameraView.showPoints([]) | |
| return | |
| } | |
| // Convert points from Vision coordinates to AVFoundation coordinates. | |
| thumbTip = CGPoint(x: thumbTipPoint.location.x, y: 1 - thumbTipPoint.location.y) | |
| wrist = CGPoint(x: wristPoint.location.x, y: 1 - wristPoint.location.y) | |
| DispatchQueue.main.async { | |
| self.processPoints([thumbTip, wrist]) | |
| } | |
| } catch { | |
| cameraFeedSession?.stopRunning() | |
| let error = AppError.visionError(error: error) | |
| DispatchQueue.main.async { | |
| error.displayInViewController(self) | |
| } | |
| } | |
| } | |
| } |
It’s worth noting that the points returned by the VNObservation belong to the Vision coordinate system. We need to convert them to the UIKit coordination to eventually draw them on the screen.
So, we’ve converted them into the AVFoundation coordinate system in the following way:
wrist = CGPoint(x: wristPoint.location.x, y: 1 - wristPoint.location.y)Subsequently, we’ll pass these points in the processPoints function. For the sake of simplicity, we’re using just two landmarks — thumb tip and wrist — to detect the hand gestures.
Here’s the code for the processPoints function:
| func processPoints(_ points: [CGPoint?]) { | |
| let previewLayer = cameraView.previewLayer | |
| var pointsConverted: [CGPoint] = [] | |
| for point in points { | |
| pointsConverted.append(previewLayer.layerPointConverted(fromCaptureDevicePoint: point!)) | |
| } | |
| let thumbTip = pointsConverted[0] | |
| let wrist = pointsConverted[pointsConverted.count - 1] | |
| let yDistance = thumbTip.y - wrist.y | |
| if(yDistance > 50){ | |
| if self.restingHand{ | |
| self.restingHand = false | |
| self.handDelegate?.thumbsDown() | |
| } | |
| }else if(yDistance < -50){ | |
| if self.restingHand{ | |
| self.restingHand = false | |
| self.handDelegate?.thumbsUp() | |
| } | |
| } | |
| else{ | |
| self.restingHand = true | |
| } | |
| cameraView.showPoints(pointsConverted) | |
| } |
The following line of code converts the AVFoundation coordinate system to the UIKit coordinates:
previewLayer.layerPointConverted(fromCaptureDevicePoint: point!)Finally, based on the absolute threshold distance between the two points, we trigger the respective left swipe or right swipe action on the stack of cards.
cameraView.showPoints(pointsConverted) draws a line between the two points on the CameraView sublayer.
Here’s the full code of the CameraView class:
| import UIKit | |
| import AVFoundation | |
| class CameraView: UIView { | |
| private var overlayThumbLayer = CAShapeLayer() | |
| var previewLayer: AVCaptureVideoPreviewLayer { | |
| return layer as! AVCaptureVideoPreviewLayer | |
| } | |
| override class var layerClass: AnyClass { | |
| return AVCaptureVideoPreviewLayer.self | |
| } | |
| override init(frame: CGRect) { | |
| super.init(frame: frame) | |
| setupOverlay() | |
| } | |
| required init?(coder: NSCoder) { | |
| super.init(coder: coder) | |
| setupOverlay() | |
| } | |
| override func layoutSublayers(of layer: CALayer) { | |
| super.layoutSublayers(of: layer) | |
| if layer == previewLayer { | |
| overlayThumbLayer.frame = layer.bounds | |
| } | |
| } | |
| private func setupOverlay() { | |
| previewLayer.addSublayer(overlayThumbLayer) | |
| } | |
| func showPoints(_ points: [CGPoint]) { | |
| guard let wrist: CGPoint = points.last else { | |
| // Clear all CALayers | |
| clearLayers() | |
| return | |
| } | |
| let thumbColor = UIColor.green | |
| drawFinger(overlayThumbLayer, Array(points[0...1]), thumbColor, wrist) | |
| } | |
| func drawFinger(_ layer: CAShapeLayer, _ points: [CGPoint], _ color: UIColor, _ wrist: CGPoint) { | |
| let fingerPath = UIBezierPath() | |
| for point in points { | |
| fingerPath.move(to: point) | |
| fingerPath.addArc(withCenter: point, radius: 5, startAngle: 0, endAngle: 2 * .pi, clockwise: true) | |
| } | |
| fingerPath.move(to: points[0]) | |
| fingerPath.addLine(to: points[points.count - 1]) | |
| layer.fillColor = color.cgColor | |
| layer.strokeColor = color.cgColor | |
| layer.lineWidth = 5.0 | |
| layer.lineCap = .round | |
| CATransaction.begin() | |
| CATransaction.setDisableActions(true) | |
| layer.path = fingerPath.cgPath | |
| CATransaction.commit() | |
| } | |
| func clearLayers() { | |
| let emptyPath = UIBezierPath() | |
| CATransaction.begin() | |
| CATransaction.setDisableActions(true) | |
| overlayThumbLayer.path = emptyPath.cgPath | |
| CATransaction.commit() | |
| } | |
| } |
Final Output
The output of the application in action is given below:
Conclusion
From gesture-based selfie clicks to drawing signatures to finding the different hand gestures people make in videos, there are so many ways you can take advantage of Vision’s new Hand Pose Estimation request.
One could also chain this Vision request with, say, a body pose request, to build complex gestures.
The full source code of the above project is available in the GitHub Repository.